Your Essential Guide to Beakers: Types, Uses, and Care for Every Experiment
Introduction: The Unsung Hero of the Lab Bench
When we picture a science lab, a few iconic pieces of equipment often come to mind. Test tubes, microscopes, maybe even a bubbling flask. But there’s one simple, versatile, and absolutely indispensable item that quietly underpins countless experiments: the beaker. Often overlooked, this humble piece of laboratory glassware is far more than just a glorified cup. It’s a fundamental tool for mixing, heating, and holding liquids, and understanding its nuances can truly elevate our scientific endeavors. Today, we’re going on a little journey to explore everything about beakers, from their different types to how we can use them effectively, and even where to find the best ones for our needs.
What Exactly Is a Beaker? Defining This Lab Staple
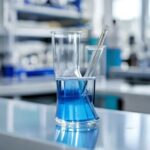
At its core, a beaker is a cylindrical container with a flat bottom and a small spout or “lip” for pouring. Most beakers come with approximate volume markings on their side, but it’s crucial to remember these are for estimation only, not for precise measurements. Think of them as the multi-purpose bowls of the lab world – great for mixing ingredients or holding things temporarily, but you wouldn’t use them to measure out exactly 250ml for a sensitive recipe. We rely on their wide mouth for easy stirring and pouring, making them incredibly practical for a vast array of tasks.
Types of Laboratory Beakers: More Than Just a Glass Cup
When we talk about types of laboratory beakers, we’re primarily looking at differences in material and shape, though the basic function remains similar. Here are the most common ones we’ll encounter:
Griffin Beakers: These are the most common type, recognized by their low height compared to their diameter and the prominent pouring spout. They’re perfect for general mixing, dissolving solids, and preparing solutions.
Tall-Form (Berzelius) Beakers: As the name suggests, these are taller and have a smaller diameter than Griffin beakers. They’re ideal when we need to minimize evaporation, such as when heating liquids, or when we need to use a stirring rod more effectively without splashing. For instance, when unlocking every essential glass rod function in your lab, a tall-form beaker can provide better control.
Flat-Bottom Beakers: Less common, these lack the spout and are primarily used for crystallization or when a flat surface is needed for a specific reaction.
How to Use a Beaker Effectively in Your Experiments
Mastering how to use a beaker isn’t rocket science, but there are best practices that can make our experiments smoother and safer:
For Mixing and Dissolving: Their wide mouth makes beakers excellent for mixing solutions with a stirring rod. We can easily add reagents and observe reactions. Remember to stir gently to avoid splashing, especially with corrosive materials.
For Heating: Beakers made of borosilicate glass (like Pyrex or Kimax) are highly resistant to thermal shock. We can heat liquids directly over a Bunsen burner (with a wire gauze to spread the heat evenly) or on a hot plate. Just remember not to heat a sealed beaker, as pressure could build up!
For Holding and Transferring: Beakers are perfect for temporarily holding liquids, collecting filtrates, or transferring solutions from one container to another. Their pouring spout helps minimize drips and spills.
For Approximate Measurements: While not for precision, their volume markings are useful for rough estimates. If we need exact volumes, we should always reach for a graduated cylinder or a volumetric flask.
Glass vs. Plastic Beakers: Choosing the Right Material
The choice between glass vs plastic beakers often comes down to the specific application and safety considerations. Each has its advantages:
Glass Beakers (Borosilicate):
- Pros: Excellent chemical resistance, high heat resistance (can be heated directly), optically clear for viewing contents, easily sterilized.
- Cons: Fragile (can break), heavier, more expensive.
- Best for: Heating reactions, strong acids/bases, high-temperature experiments, general chemical work.
Plastic Beakers (Polypropylene, Polymethylpentene):
- Pros: Unbreakable (safer for handling by students or in high-traffic areas), lightweight, often cheaper, good resistance to many chemicals.
- Cons: Limited heat resistance (cannot be heated directly), some chemicals can react with or absorb into plastic, less optically clear over time.
- Best for: General solutions, school labs, situations where breakage is a concern, experiments not requiring high heat.
Where to Buy Chemistry Beakers: Finding Your Lab’s Essentials
Whether you’re setting up a home lab, stocking a school science room, or just need a replacement, knowing where to buy chemistry beakers is key. For best beakers for science experiments, we typically look to specialized scientific supply companies. Major players like Fisher Scientific, VWR, and Sigma-Aldrich are reliable sources, offering a wide range of types, sizes, and brands (Pyrex, Kimax, etc.). Online retailers like Amazon also carry scientific glassware from various manufacturers, which can be convenient for smaller orders or individual enthusiasts. When buying, always check the material (borosilicate glass or specific plastics) and the stated capacity to ensure it meets your experimental needs.
Conclusion: Appreciating the Humble Beaker
From simple mixing to complex chemical reactions, the beaker is a cornerstone of scientific exploration. We’ve seen how its different types and materials cater to various needs, and how a proper understanding of its uses can ensure both accuracy and safety in our experiments. While it may not have the intricate design of a volumetric flask or the dramatic flair of a Bunsen burner, the beaker’s simplicity and versatility make it truly invaluable. So, the next time you reach for one, remember the silent workhorse it is, enabling countless discoveries, one pour at a time.
Frequently Asked Questions (FAQ) About Beakers
Q1: Can I use a beaker for precise measurements?
No, beakers are not designed for precise measurements. Their volume markings are approximate. For accurate measurements, you should always use a graduated cylinder, volumetric flask, or pipette.
Q2: Why do beakers have a spout?
The spout (or pouring lip) on a beaker is designed to facilitate easy and controlled pouring of liquids, minimizing drips and spills. It also allows for a glass rod to be rested across the top during stirring.
Q3: What kind of glass are lab beakers made from?
Most laboratory glass beakers are made from borosilicate glass (e.g., Pyrex, Kimax). This type of glass is highly resistant to thermal shock, meaning it can withstand rapid temperature changes without breaking, and also offers excellent chemical resistance.
Q4: Can plastic beakers be heated?
Generally, plastic beakers cannot be heated directly over a flame or on a hot plate. While some plastics like polypropylene can tolerate higher temperatures than others, direct heating can cause them to melt, deform, or leach chemicals. Always check the manufacturer’s specifications for heat resistance.
Q5: What’s the main difference between a beaker and an Erlenmeyer flask?
A beaker has a cylindrical shape with a flat bottom and a spout, making it ideal for mixing, pouring, and general holding. An Erlenmeyer flask has a conical body with a narrow neck, which reduces evaporation and is good for swirling liquids without spilling, or for containing reactions that produce fumes, as it can be easily stoppered.