Débloquer le potentiel du laboratoire : Votre guide complet sur le mortier et le peste dans la recherche scientifique

Introduction: Le héros non-sung de la préparation des échantillons
Lorsque nous pensons à la recherche scientifique de pointe, notre esprit saute souvent à des machines complexes, des microscopes ou des ordinateurs puissants. Mais parfois, les outils les plus essentiels sont aussi les plus simples. Aujourd'hui, nous plongeons profondément dans le monde mortier et pilon de laboratoire – une pièce indispensable d'équipement de laboratoire qui a été un meilleur ami scientifique pendant des siècles. Vous pourriez penser que c'est juste pour "grinding stuff", mais croyez-moi, son rôle dans la précision Préparation de l'échantillon et homogénéisation est absolument essentiel pour obtenir des résultats expérimentaux fiables. Sans ce duo humble, de nombreuses analyses avancées ne seraient tout simplement pas possibles. Laissez-nous explorer pourquoi cet outil est encore une base dans les laboratoires modernes et comment nous pouvons maîtriser son utilisation.
Qu'est-ce qu'un Lab Mortar et Pestle ?
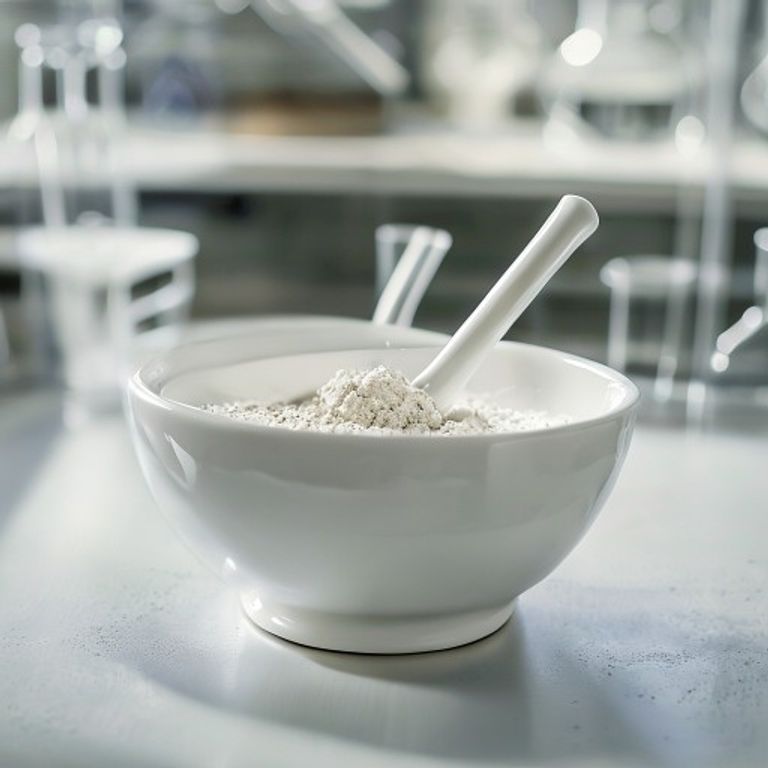
À son cœur, un mortier et un pilon est une paire d'outils utilisés pour écraser, broyer et mélanger des substances. Pensez-y comme un mélangeur manuel et super précis pour vos échantillons de laboratoire ! Le mortier est le vase en forme de bol, et le pilon est l'objet lourd en forme de club utilisé pour presser et broyer le matériau contre la surface intérieure du mortier. Dans le laboratoire, nous l'utilisons pour des tâches comme la réduction des produits chimiques solides à une poudre fine, en mélangeant soigneusement différents composés (un processus appelé trituration) ou même de décomposer les tissus végétaux pour extraction.
Types de mortiers et de pesticides utilisés dans les laboratoires
Tout comme vous ne feriez pas d'utilisation d'un marteau pour un travail délicat, choisir le bon type de mortier et de pilon est crucial pour le succès du laboratoire. Différents matériaux offrent des propriétés différentes, les rendant adaptés à des applications spécifiques:
- Mortar et peste de porcelaine : C'est probablement le type le plus commun que vous allez rencontrer. La porcelaine est durable, relativement inerte et facile à nettoyer, ce qui la rend idéale pour le broyage général de dureté modérée. Nous l'utilisons souvent pour des produits chimiques qui ne sont pas trop abrasifs ou sensibles à la contamination.
- Agate Mortar et Pestle : Si vous devez obtenir une poudre ultra-fine avec une contamination minimale, agate est notre go-to. Il est incroyablement dur et non poreux, ce qui le rend parfait pour préparer des échantillons pour des techniques analytiques sensibles comme la diffraction des rayons X ou la spectroscopie. C'est aussi super pour le monde diversifié des utilisations du mortier et du pilon où la précision compte. Cependant, il est plus fragile et cher, donc nous le traitons avec un soin supplémentaire!
- Mortar et peste en verre : Pour les matériaux très doux, les composés sensibles, ou lorsque nous avons besoin d'une clarté visuelle absolue du processus de rectification, le verre est un bon choix. Il est très résistant aux attaques chimiques et très facile à nettoyer, empêchant la contamination croisée.
- Mortar et peste en acier inoxydable : Lorsqu'il s'agit d'échantillons durs, fibreux ou extrêmement durs qui pourraient endommager la porcelaine ou l'agate, l'acier inoxydable vient à la rescousse. Il est robuste et résistant aux chocs, bien que nous devons être attentifs à la contamination potentielle des métaux pour certaines analyses.
Comment utiliser Mortar et Pestle en laboratoire : un guide pratique
Le broyage efficace n'est pas juste de casser des choses; c'est une technique! Voici comment nous l'abordons habituellement:
- La préparation est la clé : Commencez toujours par un mortier et un pilon propres et secs. Tout résidu peut contaminer notre échantillon ou interférer avec le processus de broyage.
- Chargez votre échantillon : Placez une petite quantité de votre matériel dans le mortier. Le surremplissage rend le broyage inefficace et désordonné.
- La technique de broyage :
- Commencez par des mouvements circulaires et doux, en utilisant le pilon pour écraser des morceaux plus grands contre les côtés et le fond du mortier.
- Augmenter progressivement la pression à mesure que les particules deviennent plus petites.
- Nous tournons habituellement le mortier périodiquement pour assurer un meulage uniforme.
- Pour trituration (mélange), nous combinons les poudres et utilisons un mouvement circulaire ou figuratif constant jusqu'à ce que le mélange soit homogène.
- Atteindre la finesse : Continuer le broyage jusqu'à ce que la granulométrie désirée soit atteinte. Pour la plupart des applications de laboratoire, nous visons une poudre fine et cohérente.
- Craquage vers le bas: Récupérer périodiquement tout matériau qui s'accroche aux côtés du mortier et du pilon avec une spatule propre pour s'assurer que tout est traité.
Le meilleur Mortar et Pestle pour le laboratoire de chimie: Choisir judicieusement
Décision sur la meilleur mortier et pilon pour un laboratoire de chimie dépend fortement de l'application spécifique. Pour la chimie générale, un ensemble de porcelaine de bonne qualité est souvent suffisant. Si nous travaillons avec des échantillons précieux ou très sensibles pour l'analyse des traces, investir dans un ensemble d'agate est sage. Considérez ces facteurs :
- Compatibilité des matériaux: Le mortier et le pilon réagiront-ils ou contamineront-ils votre échantillon?
- Dureté de l'échantillon: Les échantillons mous peuvent utiliser du verre, tandis que les échantillons plus difficiles nécessitent de la porcelaine ou de l'acier inoxydable.
- Taille désirée des particules : Pour les poudres ultra-fines, l'agate est inégalée.
- Coût et durabilité : Agate est précis mais délicat; la porcelaine est robuste et rentable.
Applications du mortier et du peste dans les laboratoires scientifiques
La polyvalence du mortier et du pilon brille vraiment dans ses diverses applications dans différents domaines scientifiques :
- Chimie analytique: Préparation d'échantillons solides pour des techniques comme la spectroscopie IR, la diffraction des rayons X ou la dissolution d'échantillons pour l'absorption atomique.
- Produits pharmaceutiques: Comprimés de broyage, mélange d'ingrédients pharmaceutiques actifs (IPA) avec des excipients et préparation de formulations personnalisées.
- Biologie et biochimie : Perturbation des cellules douces pour l'extraction enzymatique, homogénéisation des tissus végétaux pour l'isolement de l'ADN ou des protéines.
- Sciences des matériaux : Création de poudres fines en céramique ou en polymères pour une transformation ou une caractérisation ultérieure.
- Sciences de l'environnement : Des échantillons de sol, de plantes ou de sédiments pour les préparer à l'analyse des contaminants.
Nettoyage du mortier et du peste après utilisation en laboratoire
Un nettoyage adéquat n'est pas négociable pour prévenir la contamination croisée et assurer la longévité de nos outils. Voici notre routine :
- Mesures immédiates : Nettoyez le mortier et le pilon immédiatement après utilisation. Les résidus séchés sont beaucoup plus difficiles à éliminer.
- Rincement initial: Utilisez l'eau du robinet pour rincer les particules lâches.
- Détergent Wash: Laver soigneusement avec un détergent de laboratoire et une brosse. Pour les résidus tenaces, nous pouvons utiliser une petite quantité de poudre abrasive (comme de la silice ou de l'alumine) et le broyer dans le mortier avec le pilon, puis le laver.
- Laver les solvants (si nécessaire): Si nous avons travaillé avec des composés organiques, nous pourrions suivre avec un rinçage approprié au solvant (par exemple, l'acétone ou l'éthanol).
- Rincement profond : Rincer plusieurs fois avec de l'eau distillée ou désionisée pour éliminer toutes les traces de détergent ou de solvant.
- Séchage: Sécher à l'air complètement ou essuyer délicatement avec un chiffon sans peluche avant de le conserver. S'assurer qu'il est complètement sec empêche la croissance microbienne et maintient son intégrité.
Conclusion : L'héritage durable
Les mortier et pilon de laboratoire pourrait sembler un outil simple d'une autre époque, mais son importance fondamentale dans la réalisation précise Préparation de l'échantillon, efficace broyage, et approfondi homogénéisation reste aussi vital que jamais. De la préparation d'échantillons pour des analyses de pointe au mélange de composés pour de nouvelles formulations de médicaments, ce duo dynamique est vraiment un héros méconnu du laboratoire scientifique. En comprenant ses types, en maîtrisant son utilisation et en les maintenant correctement, nous nous autorisons à mener des recherches plus précises et plus fiables, prouvant que parfois, les solutions les plus simples sont en effet les plus puissantes.
FAQ: Vos questions Mortar et Pestle
Q: Puis-je utiliser un mortier et un pilon pour tous les types d'échantillons?
R: Bien que techniquement possible, il est généralement pas recommandé. Différents échantillons peuvent laisser des résidus ou exiger différents niveaux de finesse. Pour les travaux critiques, nous désignons souvent des ensembles de mortiers et de pesticides spécifiques pour des types particuliers d'échantillons (p. ex., un pour les produits organiques, un pour les produits inorganiques) afin de minimiser la contamination croisée.
Q: Comment puis-je prévenir la contamination en utilisant un mortier et un pilon?
R : Le nettoyage méticuleux avant et après chaque utilisation est la méthode principale. Assurez-vous que les outils sont complètement secs. Aussi, évitez de toucher les surfaces de broyage avec des mains nues, et toujours utiliser des spatules propres pour manipuler les échantillons.
Q: Quelle est la différence entre le broyage et la trituration?
R: "Grinçage" désigne généralement la réduction physique de la taille des particules, transformant des morceaux plus grands en poudres plus petites. «Trituration», bien qu'il s'agisse souvent de broyage, il s'agit plus particulièrement du processus de mélange complet de deux ou plusieurs substances solides, souvent pour créer un mélange homogène ou pour diluer un composé puissant en utilisant un diluant inerte.