Guide ultime sur le mortar et le pestle de laboratoire : maîtriser la préparation des échantillons
Pernahkah Anda bertanya-tanya bagaimana sampel papat yang keras diubah menjadi bubuk halus siap untuk analisis ilmiah? Nah, salah satu alat paling sederhana namun paling ampuh di laboratorium, yang seering kita lupakan, adalah mortier et pilon de laboratoire. Mungkin terlihat kuno di era peralatan canggih, tapi jangan salah, perannya sangat fondamental!
Sebagai seorang profesional di laboratorium, saya sering melihat betapa vitalnya mortier dan alu dalam berbagai aplikasi, mulai dari farmasi hingga ilmu matériel. Alat ini adalah Chevaux de travail Yang tak tergantikan untuk broyage d'échantillons solides avec mortier et pilon, mencampur, dan menghomogenkan bahan. Mari kita selami lebih dalam dunia mortier et pilon de laboratoire Dan temukan rahasia di balik efisiensinya.
Pourquoi chaque laboratoire a besoin d'un mortier et d'un pestil : la fondation de la préparation des échantillons
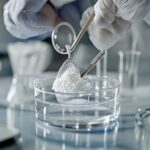
Imaginez essayer d'extraire des composés d'une feuille de plante ou de dissoudre un produit chimique solide dans un solvant. Si les particules sont trop grandes, le processus sera lent et inefficace, voire impossible. C'est là que le mortier et le pilon entrent en jeu. C'est un morceau primaire de équipement de préparation de l'échantillon, conçu pour réduire la taille des particules, augmenter la surface et assurer un mélange homogène. Pensez-y comme un mini-grindeur dans votre main, vous donnant un contrôle précis sur la texture de votre matériau.
De la décomposition des échantillons de roche pour l'analyse géologique à la préparation des préparations pharmaceutiques, la capacité d'obtenir une poudre fine et cohérente est cruciale. Sans cette étape, de nombreux tests ou réactions analytiques subséquents ne produiraient tout simplement pas des résultats précis ou reproductibles. C'est vraiment l'un des plus basiques mais essentiels outils de meulage de laboratoire Oui.
Types de mortier et de peste pour usage en laboratoire : Choisir votre matériel avec sagesse
Tous les mortiers et les pestes ne sont pas égaux. Le matériel qu'ils fabriquent dicte leur meilleur cas d'utilisation. Comprendre les différents types de mortier et de pilon pour usage en laboratoire est essentiel pour prévenir la contamination et obtenir des résultats optimaux.
Porcelaine/Céramique: Ce sont les plus communs et polyvalents. Ils sont abordables, raisonnablement durs et résistants à de nombreux produits chimiques. Idéal pour le broyage à usage général de sels, minéraux et matières végétales. Cependant, ils peuvent parfois jeter de petites particules de céramique.
Agate: Le Rolls-Royce de mortiers et de pestes ! Connu pour leur dureté extrême et leur surface non poreuse, mortier agate et pilon pour analyse en laboratoire sont parfaits pour le broyage ultra-fin où la contamination de la surface de broyage doit être minimisée. Pensez à une analyse spectroscopique sensible ou à des échantillons précieux. Ils sont toutefois plus fragiles et plus chers.
Verre: Idéal pour mélanger des liquides ou des solides très mous qui nécessitent une abrasion minimale. Ils sont faciles à nettoyer et à inspecter visuellement les résidus, mais sont très fragiles et ne conviennent pas pour le broyage dur.
Acier/métal: Utilisé pour des échantillons très durs qui peuvent casser la porcelaine ou l'agate, ou quand il y a un froid extrême (p. ex., avec de l'azote liquide). L'inconvénient est une contamination potentielle des métaux.
Comment utiliser le Mortar et le Pestle en laboratoire : un guide étape par étape sur le broyage
L'utilisation efficace d'un mortier et d'un pilon est plus artistique que scientifique, mais il existe des techniques à maîtriser. Si vous vous demandez how to use mortar and pestle in laboratory, here’s a simple guide:
Choisissez la bonne taille : Don’t overload the mortar. Start with a small amount of sample that comfortably fits and allows for movement of the pestle.
Initial Crushing (If Needed): For very hard samples, start by gently pressing down and twisting the pestle to break larger pieces into smaller fragments. Avoid forceful impacts, especially with brittle materials like agate.
Trituration: This is the main grinding action. Apply firm, circular, and often slightly eccentric (off-center) pressure with the pestle against the inside surface of the mortar. The goal is a rubbing, shearing action, not just pounding. This is the core of the trituration technique.
Gratter et recueillir : Periodically scrape down the sides of the mortar with a spatula to bring all material back to the center for consistent grinding. You’re aiming for even particle size reduction apparatus.
Assess Fineness: Continue until you achieve the desired particle size. A good way to check is to rub a small amount between your fingers – it should feel smooth and uniform.
Transferring Your Sample: Once ground, carefully transfer your sample. For precise measurements, especially in quantitative analysis, remember that accurate weighing is critical. This is where you might need to Débloquer la précision : votre guide pratique pour l'étalonnage de l'équilibre analytique to ensure your subsequent steps are reliable.
Mastering the Grind: Conseils pour réduire efficacement la taille des particules et l'homogénéisation
To truly get the most out of your mortar and pestle, consider these expert tips for effective homogenization methods lab:
Grind in Batches: Overfilling reduces efficiency. Work with smaller amounts for better control and faster results.
Add a Small Amount of Liquid (If Applicable): For some samples, adding a tiny amount of a compatible solvent can help create a paste, aiding in uniform grinding and preventing dust, a process sometimes called “levigation.”
Cool the Sample: For heat-sensitive or very sticky samples, chilling them (or even using liquid nitrogen with appropriate materials like steel) can make them brittle and easier to grind into a fine powder.
La patience est la clé : Rushing leads to uneven grinding. Take your time, apply consistent pressure, and ensure all particles are being processed.
Nettoyage et entretien du mortier et du peste de laboratoire : prévenir la contamination
Cleaning and maintaining lab mortar and pestle properly is paramount to prevent cross-contamination, which can ruin your experiments. Here’s how:
Nettoyage immédiat : Nettoyez le mortier et le pilon immédiatement après utilisation. Les résidus séchés sont beaucoup plus difficiles à éliminer.
Mechanical Removal: Start by scraping out as much visible sample as possible with a spatula.
Lavage: Wash with appropriate solvent (often distilled water and a lab detergent). Use a brush to scrub the surface thoroughly, especially the textured inner surface of the mortar. Rinse extensively with distilled water.
Séchage: Air dry or oven dry at a low temperature. Ensure it’s completely dry before storing to prevent microbial growth or sample absorption.
Special Cleaning for Agate: For agate, avoid harsh abrasives. A simple wipe with solvent and then ethanol/isopropanol, followed by rinsing with distilled water, is usually sufficient. Since they are non-porous, contamination is easier to remove.
Stockage & #160;: Store them in a clean, dust-free environment, preferably with the pestle inside the mortar or covered separately.
Conclusion
Les mortier et pilon de laboratoire, while simple, remains an indispensable tool in modern laboratories. Its ability to perform precise particle size reduction apparatus and achieve thorough homogenization makes it critical for countless applications. By understanding the different types, mastering the proper grinding techniques, and committing to rigorous cleaning and maintenance, we can ensure this humble duo continues to deliver accurate and reliable sample preparation for years to come. So, next time you reach for one, remember the powerful science it enables!
FAQ
Q: Puis-je utiliser un mortier de cuisine et un pilon dans le laboratoire?
A: It’s generally not recommended. Kitchen mortars are often made of materials that might not be chemically resistant or cleanable to laboratory standards, increasing the risk of contamination or unwanted reactions.
Q: Comment savoir quel matériau choisir pour mon mortier et mon pilon?
A: Consider the hardness of your sample, the required fineness, and the potential for contamination. Porcelain is good for general use, agate for sensitive analyses, and glass for mixing soft materials.
Q: Y a-t-il une alternative au mortier et au pilon pour le broyage?
A: Yes, depending on the sample and desired fineness, alternatives include ball mills, planetary mills, blenders (for larger samples), and tissue homogenizers. However, for small, precise grinding, the mortar and pestle offers unique control.
Q : À quelle fréquence dois-je remplacer mon mortier et mon pilon de laboratoire?
A: A well-maintained mortar and pestle can last for decades. Replace it if you notice significant chips, cracks, or excessive wear on the grinding surfaces that could lead to contamination or inefficient grinding.