Mastering Condensers in the Chemistry Lab: Setup, Maintenance, Troubleshooting & Safety
Introduction
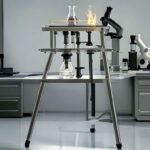
When we talk about a smooth reflux or a clean distillation, the unsung hero is often the laboratory condenser. Whether you’re a seasoned organic chemist or a student setting up your first experiment, knowing how to handle condensers can make the difference between success and a messy failure. In this article I’ll walk you through the practical steps to set up a condenser, keep it sparkling clean, solve common hiccups, choose the right type for organic synthesis, and stay safe while you work.
How to Set Up a Condenser in a Chemistry Lab
Think of a condenser as a tiny heat‑exchanger that turns vapor back into liquid. The basic setup is simple, but the details matter:
- Connect the inlet and outlet. The cold‑water inlet should be at the bottom of the condenser, while the outlet goes at the top. This ensures water flows counter‑current to the vapor, maximizing cooling efficiency.
- Secure the glassware. Use a sturdy retort stand and clamp the condenser firmly to prevent movement during reflux.
- Check the seals. Make sure rubber joints or ground‑glass joints are greased properly to avoid leaks.
- Start the water flow. A steady stream of cold water (usually 5‑10 °C) should be visible at the outlet before you begin heating.
Following these steps will give you a reliable lab condensers guide that works every time.
Best Practices for Cleaning Laboratory Condensers
Cleaning isn’t just about aesthetics; residues can block cooling channels and cause cross‑contamination. Here’s a quick routine:
- Disassemble the condenser after each use (remove the inlet/outlet adapters).
- Rinse with warm distilled water to remove bulk chemicals.
- Soak in a mild detergent solution for 15‑20 minutes.
- Use a soft brush or pipe cleaner to scrub the inner tube gently.
- Rinse thoroughly with deionized water and dry with compressed air.
- Inspect for cracks or cloudy glass before storing.
Regular maintenance keeps the condensers lab equipment operating at peak efficiency.
Troubleshooting Common Condenser Problems
Even with careful setup, issues can arise. Here are the most frequent symptoms and quick fixes:
1. Leaking at the joints
Check the greasing of ground‑glass joints and tighten clamps. If the leak persists, the joint may be damaged and need replacement.
2. Inadequate cooling (vapor “puffs” out)
Make sure the water inlet is at the bottom and the flow rate is sufficient. A clogged inlet or kinked tubing can dramatically reduce cooling power.
3>Condensate not collecting
Verify that the receiving flask is properly positioned and that the condenser’s outlet is not blocked. Also, confirm that the cooling water is not too warm.
Types of Condensers Used in Organic Synthesis Labs
Choosing the right condenser depends on the reaction scale, temperature range, and solvent volatility. The most common varieties include:
- Water‑cooled (Liebig) condenser: Simple, ideal for reflux and low‑temperature distillations.
- All‑glass (Graham) condenser: Provides a larger cooling surface; great for higher boiling points.
- Condenser with reflux coil: Offers enhanced cooling efficiency for long reflux runs.
- Dry‑ice/acetone condenser: Used when sub‑ambient temperatures are required.
Understanding each type helps you design a more efficient reflux apparatus or distillation setup.
Safety Guidelines for Using Condensers in Chemical Research
Safety isn’t an afterthought—it’s built into every step:
- Wear appropriate PPE: lab coat, safety goggles, and heat‑resistant gloves.
- Never leave a heated reflux unattended.
- Check water temperature; extremely cold water can cause glass fracture.
- Use pressure‑relief valves or vent tubes when working with volatile solvents.
- Keep a spill kit and fire extinguisher within arm’s reach.
By treating the condenser as a critical safety component, you protect both your experiment and yourself.
Conclusion
Mastering condensers is all about a blend of proper setup, diligent cleaning, quick troubleshooting, and strict safety. With the right type of condenser and a few practical habits, you’ll see smoother refluxes, cleaner distillations, and fewer unexpected interruptions. So next time you assemble your apparatus, remember these tips and let the condenser do its cool job—literally.
FAQ
What is the ideal water flow rate for a Liebig condenser?
Typically 5‑10 L/min; adjust until you see a steady stream at the outlet and the vapor condenses efficiently.
Can I use tap water for cooling?
Tap water works, but for high‑precision work use chilled distilled water to avoid mineral deposits.
How often should I replace a glass condenser?
If you notice cracks, persistent cloudiness, or repeated leaks, replace it immediately. Otherwise, a yearly visual inspection is sufficient.
Is it safe to run a reflux overnight?
Only with an automated temperature controller, a reliable cooling system, and a safety‑shutoff valve. Never leave an unsupervised open flame.
What’s the difference between a Graham and a Liebig condenser?
A Graham condenser has a larger surface area due to its double‑wall design, providing better cooling for higher boiling solvents.